스택이란?


스택에 10, 20, 30 순서로 숫자를 3개 넣어봅니다. (push 연산)

가장 먼저 들어간 10이 맨 아래에 있게 됩니다. 


스택의 push 연산


10을 즉시 꺼낼 수 없고, 30 부터 꺼내야 마지막으로 10을 얻을 수 있습니다. (pop 연산)


스택의 pop 연산


이처럼 '가장 먼저 들어간 요소가 가장 마지막에 나오는 구조 입니다. 

그래서 FILO (First In Last Out) 라고 부릅니다. 

자동메모리가 스택을 기반으로 동작하고, 대부분의 네트워크 프로토콜도 스택을 기반으로 구성되어 있습니다. 


배열로 구현하는 스택 


배열을 이용하면, 동적으로 스택의 길이를 조절할 수 없지만, 구현이 간단합니다. 

사용자가 정한 숫자만큼의 길이를 가진 배열을 만듭니다. 

그리고 최상위 노드의 위치를 알고있는 변수로 삽입과 제거 연산을 합니다. 


스택의 노드 


스택에 들어갈 노드입니다. 

데이터 하나를 담는 노드를 구조체로 표현합니다. 

노드의 위치는 배열의 인덱스로 알 수 있습니다. 

typedef struct Node {
	int data;
}Node;


다음은 스택 구조체입니다. 

구조체 ArrayStack에 필요한 필드는 세 가지 입니다. 

배열의 길이
배열
최상위 노드의 위치 

노드가 최대 몇 개 들어갈 수 있는지 배열의 길이를 알아야 합니다. 

그리고 노드를 저장할 '배열'이 필요하고, 최상위 노드의 위치로 삽입/제거 합니다. 

typedef struct ArrayStack {
	int capacity;		/* 배열 용량 */
	int top;	/* 최상위 노드 위치 */
	Node* arrayNodes;	/* 노드들을 보관하는 스택배열 */
}ArrayStack;

노드 배열은 포인터로 선언되어 있습니다. (포인터는 배열로 사용할 수 있습니다)


스택의 생성과 메모리해제 


CreateArrayStack() 함수는 배열의 최대길이를 이용하여 스택을 생성합니다.  

/* 스택 생성.  메모리 할당 */
void CreateArrayStack(ArrayStack** stack, int capacity) {
	printf("[ 스택 생성 CreateArrayStack ]\n");

	/* 스택을 자유 저장소에 생성 */
	(*stack) = (ArrayStack*)malloc(sizeof(ArrayStack));

	/* 용량 만큼의 노드들을 자유 저장소에 생성 */
	(*stack)->arrayNodes = (Node*)malloc(sizeof(Node) * capacity);

	// 필드 초기화 
	(*stack)->capacity = capacity;
	(*stack)->top = 0;
}


FreeArrayStack() 함수는 노드와 스택을 자유 저장소에서 해제합니다.

void FreeArrayStack(ArrayStack** stack) {
	printf("[ 메모리 해제 FreeArrayStack ]\n");

	free((*stack)->arrayNodes);
	free((*stack));
}


삽입 연산 (PUSH)


스택 구조체가 알고있는 top 위치의 노드에 데이터를 넣습니다.

배열 인덱스가 top이 됩니다. 

데이터를 넣고, top위치를 갱신해줍니다. 

void Push(ArrayStack* stack, int inputData) {
	printf("[ 삽입연산 Push ] %d를 Push \n", inputData);

	int location = stack->top;

	stack->arrayNodes[location].data = inputData;
	stack->top = location + 1;
}


스택이 꽉 찼을 때를 확인하는 Push 함수 


스택이 꽉 찼을 때 push를 안하고 종료하는 코드를 추가해봤습니다. 


capacity와 top이 같은지 확인합니다. 

Push의 리턴을 bool로 바꾸고, 삽입이 불가하면 false를 리턴하도록 했습니다. 


bool Push(ArrayStack* stack, int inputData) {
	printf("[ 삽입연산 Push ] %d를 Push \n", inputData);

	if (stack->capacity == stack->top) {
		printf("[ 용량초과! ] 삽입이 불가합니다. \n");
		return false;
	}

	int location = stack->top;

	stack->arrayNodes[location].data = inputData;
	stack->top = location + 1;

	return true;
}


삽입/제거 연산을 확인해본 main 함수 코드입니다.


int main() {

	ArrayStack* stack = NULL;

	CreateArrayStack(&stack, 10);

	// 12번 Push
	for (int i = 10; i <= 120; i+=10) {
		if (!Push(stack, i)) {
			break;
		}
	}

	// 5번 Pop
	for (int i = 0; i < 5; i++) {
		printf("%3d를 제거합니다.\n", Pop(stack));
	}
	
	return 0;
}


배열 최대 길이가 10인데, Push 연산을 12번 했을 경우 콘솔 화면 입니다. 

10번 넣고, 11번 넣으려고 할때 용량이 초과되서 for 문을 break 합니다.

이어서 제거 연산을 5번 수행합니다. 


스택용량이 Full 인지 확인하는 함수로 분리하면 더 좋을 것 같습니다. 


제거 연산 (POP)


삽입과는 달리, top 값을 1 감소하면 됩니다. 

그리고 top 위치에 있던 data를 호출자에게 반환합니다. 

int Pop(ArrayStack* stack) {
	printf("[ 제거연산 Pop ]\n");

	int location = --(stack->top);

	return stack->arrayNodes[location].data;
}

POP 연산 시, 배열의 인덱스를 주의해야 합니다. 

왜냐하면 top이 1이라면, 노드가 위치하는 실제 인덱스는 0이기 때문입니다. 


스택이 비었는지 확인  : Pop 전에 확인 


/* 스택이 비었는지 확인 : 제거 전에 확인  */
int isEmpty(ArrayStack* stack) {
	// true 1 반환. false 0 반환 
	return (0 == stack->top);
}


전체 코드 


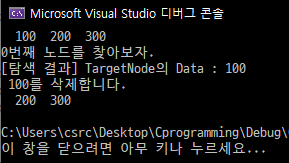
배열길이는 10을 주고 10부터 100까지 10개의 숫자를 PUSH 합니다. 

12번의 POP을 시도하지만 10번까지만 하고 종료되는 코드입니다. 


#include <stdio.h>
#include <stdlib.h>
#include <string.h>


typedef struct Node {
	int data;
}Node;

typedef struct ArrayStack {
	int capacity;		/* 배열 용량 */
	int top;	/* 최상위 노드 위치 */
	Node* arrayNodes;	/* 노드들을 보관하는 스택배열 */
}ArrayStack;


/* 스택 생성.  메모리 할당 */
void CreateArrayStack(ArrayStack** stack, int capacity) {
	printf("[ 스택 생성 CreateArrayStack ]\n");

	/* 스택을 자유 저장소에 생성 */
	(*stack) = (ArrayStack*)malloc(sizeof(ArrayStack));

	/* 용량 만큼의 노드들을 자유 저장소에 생성 */
	(*stack)->arrayNodes = (Node*)malloc(sizeof(Node) * capacity);

	// 필드 초기화 
	(*stack)->capacity = capacity;
	(*stack)->top = 0;
}

/* 메모리 해제 */
void FreeArrayStack(ArrayStack** stack) {
	printf("[ 메모리 해제 FreeArrayStack ]\n");

	free((*stack)->arrayNodes);
	free((*stack));
}

/* 삽입 Push 연산 */
void Push(ArrayStack* stack, int inputData) {
	printf("[ 삽입연산 Push ] %d를 Push \n", inputData);

	int location = stack->top;

	stack->arrayNodes[location].data = inputData;
	stack->top = location + 1;
}

/* 스택이 비었는지 확인 : 제거 전에 확인  */
int isEmpty(ArrayStack* stack) {
	// true 1 반환. false 0 반환 
	return (0 == stack->top);
}

/* 제거 Pop 연산 */
int Pop(ArrayStack* stack) {
	printf("[ 제거연산 Pop ]\n");

	int location = --(stack->top);

	return stack->arrayNodes[location].data;
}


int main() {

	ArrayStack* stack = NULL;

	CreateArrayStack(&stack, 10);

	// 10개 Push
	for (int i = 10; i <= 100; i+=10) {
		Push(stack, i);

	}

	// 12번을 pop 해본다 
	for (int i = 0; i < 12; i++) {

		if (isEmpty(stack)) {
			printf("스택이 비었습니다. \n");
			break;
		}
		else {
			printf("%3d를 제거합니다.\n", Pop(stack));
		}
	}
	
	return 0;
}


콘솔 결과 입니다. 


다음 포스팅에서는 링크드 리스트로 구현하는 스택을 다루겠습니다.


728x90

환형 링크드 리스트 


환형 링크드 리스트도 더블 링크드 리스트와 비슷합니다. 

유의할 점은 테일의 다음 노드 포인터가 헤드를 가리키게 하면 됩니다. 

이것 빼고는 더블 링크드 리스트와 똑같습니다. 그래서 노드 추가, 삭제만 살펴볼 것입니다. 


테일의 다음이 헤드이고, 헤드의 앞이 테일이기 때문에 "뒤"부터 검색할 수도 있습니다!

그래서 탐색과 추가 기능의 성능을 개선할 수 있습니다. 


환형 더블 링크드 리스트의 주요 연산 


유의할 점은 다음 두 가지 입니다. 


첫 번째, 테일은 헤드의 '앞 노드'이다. 
두 번째, 헤드는 테일의 '뒷 노드'이다. 


노드 추가 


void AppendNode(Node** head, Node* newNode) {
	printf("[AppendNode] %d를 추가합니다. \n", newNode->data);

	if (NULL == (*head)) { // 헤드가 비었다면 뉴 노드가 헤드
		
		(*head) = newNode;
		(*head)->nextNode = (*head);
		(*head)->prevNode = (*head);

	}
	else { // 테일과 헤드 사이에 뉴노드 삽입 

		// 뉴노드의 다음은 헤드, 뉴노드 이전은 테일 
		newNode->nextNode = (*head);
		newNode->prevNode = (*head)->prevNode;

		// 기존테일의 다음노드가 뉴노드.
		(*head)->prevNode->nextNode = newNode;
		// 뉴노드가 새로운 테일이 된다.
		(*head)->prevNode = newNode;

	}
}


리스트 출력 (do-while 이용)


환형 리스트 이므로, while 조건문에 유의하여 리스트를 출력했습니다. 

void PrintList(Node* list) {
	printf("[PrintList] 리스트 전체를 출력합니다. \n");

	Node* current = list;

	do {
		printf("%3d", current->data);
		current = current->nextNode;
	} while (current->nextNode != list->nextNode);

	printf("\n");
}


노드 탐색 


인덱스를 입력하여 노드의 주소를 리턴합니다. 

Node* GetLocation(Node* head, int location) {
	printf("[GetLocation] %d번째 노드를 찾아보자. \n", location);

	Node* current = head;

	while ((--location) >= 0) {
		//printf("location : %d 번째 탐색 \n", location);
		current = current->nextNode;
	}

	return current;
}


노드 삭제 


RemoveNode() 함수는 특정 주소에 있는 노드를 삭제합니다. 


void RemoveNode(Node** head, Node* target) {
	printf("[RemoveNode] %d를 삭제합니다. \n", target->data);

	if ((*head) == target) {
    	// 헤드의 앞뒤 노드의 포인터를 갱신  
		(*head)->prevNode->nextNode = (*head)->nextNode;
		(*head)->nextNode->prevNode = (*head)->prevNode;

		// 헤드를 갱신 
		(*head) = (*head)->nextNode;
	}
	else {
    	// 타겟의 앞뒤 노드의 포인터를 갱신 
		target->prevNode->nextNode = target->nextNode;
		target->nextNode->prevNode = target->prevNode;
	}

	// 타겟 메모리해제 
	target->nextNode = NULL;
	target->prevNode = NULL;
	free(target);
}


전체 코드 입니다. 

#include <stdio.h>
#include <stdlib.h>
#include <string.h>	

// 환형 링크드 리스트  

/* 노드 정의 */
typedef struct Node {
	int data;
	struct Node* prevNode;
	struct Node* nextNode;
}Node;

/* 노드 생성*/
Node* CreateNode(int data) {

	Node* newNode = (Node*)malloc(sizeof(Node));

	newNode->data = data;
	newNode->prevNode = NULL;
	newNode->nextNode = NULL;

	return newNode;
}


/* 리스트 출력 */
void PrintList(Node* list) {
	printf("[PrintList] 리스트 전체를 출력합니다. \n");

	Node* current = list;

	do {
		printf("%3d", current->data);
		current = current->nextNode;
	} while (current->nextNode != list->nextNode);

	printf("\n");
}

/* 노드 탐색 */
Node* GetLocation(Node* head, int location) {
	printf("[GetLocation] %d번째 노드를 찾아보자. \n", location);

	Node* current = head;

	while ((--location) >= 0) {
		//printf("location : %d 번째 탐색 \n", location);
		current = current->nextNode;
	}

	return current;
}


/* 노드 추가 */
void AppendNode(Node** head, Node* newNode) {
	printf("[AppendNode] %d를 추가합니다. \n", newNode->data);

	if (NULL == (*head)) { // 헤드가 비었다면 뉴 노드가 헤드
		
		(*head) = newNode;
		(*head)->nextNode = (*head);
		(*head)->prevNode = (*head);

	}
	else { // 테일과 헤드 사이에 뉴노드 삽입 

		//Node* tail = (*head)->prevNode;

		// 뉴 노드의 다음은 헤드, 뉴 노드 이전은 테일 
		newNode->nextNode = (*head);
		newNode->prevNode = (*head)->prevNode;

		// 기존테일의 다음노드가 뉴노드.
		(*head)->prevNode->nextNode = newNode;
		// 뉴노드가 새로운 테일이 된다.
		(*head)->prevNode = newNode;
	}
}


/* 노드 삭제 */
void RemoveNode(Node** head, Node* target) {
	printf("[RemoveNode] %d를 삭제합니다. \n", target->data);

	if ((*head) == target) {
		(*head)->prevNode->nextNode = (*head)->nextNode;
		(*head)->nextNode->prevNode = (*head)->prevNode;

		(*head) = (*head)->nextNode;
	}
	else {
		target->prevNode->nextNode = target->nextNode;
		target->nextNode->prevNode = target->prevNode;
	}

	// 타겟 메모리해제 
	target->nextNode = NULL;
	target->prevNode = NULL;
	free(target);
}

int main() {
	Node* list = NULL;

	AppendNode(&list, CreateNode(10));
	AppendNode(&list, CreateNode(20));
	AppendNode(&list, CreateNode(30));

	PrintList(list);
	
	// 3번째 노드 삭제(인덱스2)
	RemoveNode(&list, GetLocation(list, 2));
	PrintList(list);

	AppendNode(&list, CreateNode(40));
	PrintList(list);

	// 1번째 노드 삭제(인덱스0)
	RemoveNode(&list, GetLocation(list, 0));
	PrintList(list);

	// 2번째 노드 삭제(인덱스1)
	RemoveNode(&list, GetLocation(list, 1));
	PrintList(list);

	return 0;
}


콘솔 결과 입니다. 

728x90


더블 링크드 리스트란


링크드 리스트의 탐색 기능을 개선한 자료구조입니다.

자신의 앞에 있는 노드를 가리키는 포인터도 있어서, 앞으로도 뒤로도 이동할 수 있습니다. 

다음은 더블 링크드 리스트를 표현한 구조체입니다. 

typedef struct Node {
	struct Node* prevNode;
	int Data;
	struct Node* nextNode;
}Node;


특별한건 없고 '앞 노드'를 처리하기 위한 포인터만 추가됩니다. 


노드 생성


다음은 노드를 생성하는 CreateNode() 함수 입니다. 

'앞 노드'를 가리키는 prevNode 포인터를 NULL로 초기화 하는것 말고는 싱글 링크드 리스트와 똑같습니다. 

Node* CreateNode(int data) {

	Node* newNode = (Node*)malloc(sizeof(Node));
    
	newNode->data = data;
	newNode->prevNode = NULL;
	newNode->nextNode = NULL;

	return newNode;
}


노드 추가


테일을 찾아서 새 노드를 추가합니다. 

새 노드의 prevNode 포인터가 tail 노드를 가리키도록 합니다. 

void AppendNode(Node** head, Node* newNode) {
	
	if (NULL == (*head)) { //헤드 노드가 없다면, 새 노드가 헤드 노드
		(*head) = newNode;
	}
	else {  // 테일 노드를 찾아서, 테일 뒤에 새 노드를 덧붙인다 
		Node* tail = (*head);

		while (NULL != tail->nextNode) {
			tail = tail->nextNode;
		}

		newNode->prevNode = tail;
		tail->nextNode = newNode;

	}
}

헤드 노드가 없으면, 새 노드가 헤드 노드가 됩니다. 

그렇지 않으면, 현재 노드가 테일 노드가 될 때까지 이동하고,


테일을 찾아내면,새 노드의 이전이 테일이고, 테일의 다음 노드가 새 노드가 되도록 포인터 변수값을 넣습니다.


노드 삭제


조금 어려운 부분입니다.

변경 해야 할 노드의 포인터가 4개이기 때문입니다.


앞 노드, 삭제할 노드, 뒷 노드  순으로 존재한다고 가정할 때, 

삭제할 노드의 '앞 노드'와 삭제할 노드의 '뒷 노드'의 포인터를 포함하여 총 4개입니다. 

void RemoveNode(Node** head, Node* target) {

	printf("[RemoveNode] %2d를 삭제합니다.\n", target->data);

	if ((*head) == target) { // 헤드를 삭제하는 경우, 
		// 헤드를 변경 
		(*head) = target->nextNode;

		if (NULL != (*head)) {
			(*head)->prevNode = NULL;
		}
		// 타겟을 제거 
		target->nextNode = NULL;
		target->prevNode = NULL;
		free(target);
	}
	else { 
		// temp = 타겟
		Node* temp = target;

		// temp의 앞과 temp의 뒤를 이어준다 (타겟의 앞과 뒤를 이어준다)
		temp->prevNode->nextNode = temp->nextNode;

		if (NULL != temp->nextNode) {
			temp->nextNode->prevNode = temp->prevNode;
		}

		target->nextNode = NULL;
		target->prevNode = NULL;
		free(target);
	}
}

삭제할 노드의 '앞 노드'가 삭제할 노드의 '뒷 노드'를 가리키도록 변경합니다. 

'뒷 노드'의 prevNode* 가 '앞 노드'의 nextNode*를 가리키도록 변경합니다. 

삭제할 노드의 앞뒤 포인터 두 개를 전부 NULL을 가리키도록 변경합니다. 


중복을 제거한 다음 코드도 정상 동작합니다. 

void RemoveNode(Node** head, Node* target) {

	printf("[RemoveNode] %2d를 삭제합니다.\n", target->data);

	if ((*head) == target) { // 헤드를 삭제하는 경우, 
		// 헤드를 변경 
		(*head) = target->nextNode;

		if (NULL != (*head)) {
			(*head)->prevNode = NULL;
		}
	}
	else { 
		// temp = 타겟
		Node* temp = target;

		// temp의 앞과 temp의 뒤를 이어준다 (타겟의 앞과 뒤를 이어준다)
		temp->prevNode->nextNode = temp->nextNode;

		if (NULL != temp->nextNode) {
			temp->nextNode->prevNode = temp->prevNode;
		}
	}

	target->nextNode = NULL;
	target->prevNode = NULL;
	free(target);

}


노드 삽입 


기준 노드(current) 뒤에 새 노드(newNode)를 삽입하는 것이므로 새 노드의 포인터만 주의하면 됩니다.


새 노드의 뒤 노드는 기준노드의 다음 노드를 가리킵니다.

새 노드의 앞 노드는 기준노드를 가리킵니다.

기준노드의 다음노드의 앞 포인터(current->nextNode->prevNode)와 기준노드의 뒷 포인터(current->nextNode)를 수정합니다. 

void InsertAfter(Node* current, Node* newNode) {

	newNode->prevNode = current;
	newNode->nextNode = current->nextNode;

	if (NULL != current->nextNode) {
		current->nextNode->prevNode = newNode;
	}

	current->nextNode = newNode;
}


전체 코드 입니다. 

#include <stdio.h>
#include <stdlib.h>


// 더블 링크드 리스트 

/* 노드 선언 */
typedef struct Node {
	struct Node* prevNode;
	struct Node* nextNode;
	int data;
};


/* 노드 생성 */
Node* CreateNode(int data) {
	
	Node* newNode = (Node*)malloc(sizeof(Node));
	newNode->data = data;
	newNode->prevNode = NULL;
	newNode->nextNode = NULL;

	return newNode;
}

/* [공통] 노드 탐색 */
Node* GetLocation(Node* head, int location) {
	printf("[GetLocation]%d번째 노드를 찾아보자. \n", location);

	Node* current = head;

	while ((NULL != current) && (--location) >= 0) {
		printf("location : %d 번째 탐색 \n", location);
		current = current->nextNode;

	}

	return current;
}


/* [공통] 리스트 출력 */
void PrintList(Node* head) {
	printf("[PrintList] 리스트 전체를 출력합니다. \n");

	Node* tempNode = head;
	int count = 0;

	while (NULL != tempNode) {
		printf("%5d", tempNode->data);
		tempNode = tempNode->nextNode;
		count++;
	}
	printf("\n");
	printf("%5d개의 노드가 있습니다.\n", count);
}

/* 노드 추가. 테일 뒤에 새 노드를 덧붙인다 */
void AppendNode(Node** head, Node* newNode) {

	printf("[AppendNode] 데이터 %2d 추가합니다. \n", newNode->data);

	if (NULL == (*head)) { //헤드 노드가 없다면, 새 노드가 헤드 노드
		(*head) = newNode;
	}
	else {  // 테일 노드를 찾아서, 테일 뒤에 새 노드를 덧붙인다 
		Node* tail = (*head);

		while (NULL != tail->nextNode) {
			tail = tail->nextNode;
		}

		newNode->prevNode = tail;
		tail->nextNode = newNode;
	}
}

/* 노드 삭제 */
void RemoveNode(Node** head, Node* target) {

	printf("[RemoveNode] %2d를 삭제합니다.\n", target->data);

	if ((*head) == target) { // 헤드를 삭제하는 경우, 
		// 헤드를 변경 
		(*head) = target->nextNode;

		if (NULL != (*head)) {
			(*head)->prevNode = NULL;
		}

	}
	else { 
		// temp = 타겟
		Node* temp = target;

		// temp의 앞과 temp의 뒤를 이어준다 (타겟의 앞과 뒤를 이어준다)
		temp->prevNode->nextNode = temp->nextNode;

		if (NULL != temp->nextNode) {
			temp->nextNode->prevNode = temp->prevNode;
		}
	}

	target->nextNode = NULL;
	target->prevNode = NULL;
	free(target);

}

/* 노드 삽입. 특정 노드 뒤에 새 노드를 삽입한다. */
void InsertAfter(Node* current, Node* newNode) {

	printf("[InsertAfter] %2d를 %d 뒤에 삽입합니다.\n", newNode->data, current->data);

	newNode->prevNode = current;
	newNode->nextNode = current->nextNode;

	if (NULL != current->nextNode) {
		current->nextNode->prevNode = newNode;
	}

	current->nextNode = newNode;
}

int main() {

	Node* list = NULL;

	AppendNode(&list, CreateNode(10));
	AppendNode(&list, CreateNode(20));
	AppendNode(&list, CreateNode(30));

	PrintList(list);

	// 2번째 노드 위치 탐색(인덱스 1)
	// 2번째 노드 삭제 
	RemoveNode(&list, GetLocation(list, 1));

	PrintList(list);

	// 헤드 뒤에 삽입
	InsertAfter(list, CreateNode(40));
	PrintList(list);

	// 3번째 노드(인덱스 2) 뒤에 삽입 
	InsertAfter(GetLocation(list, 2), CreateNode(50));
	PrintList(list);

	return 0;
}


콘솔 화면 입니다.


다음 포스팅은 '환형 링크드 리스트' 입니다. 

728x90


링크드 리스트란

링크드 리스트는 '노드(마디)를 연결해서 만드는 리스트'입니다. 

노드는 데이터를 저장하는 필드'와, 다음 노드와의 연결 고리 역할을 하는 '포인터'로 이루어져 있습니다. 


노드 구조체 

노드 하나는 다음과 같은 구조체로 나타낼 수 있습니다. 

struct 키워드 없이 인스턴스를 만들기 위해, typedef 키워드로 Node 구조체를 정의합니다. 

typedef struct Node
{
    int data; /* 데이터 필드 */
    struct Node* nextNode;  /*다음 노드를 가리키는 포인터*/
}Node;


자유 저장소에 메모리 할당하기

C언어로 작성된 프로그램은 세 가지 종류의 메모리 영역을 가집니다. 

정적 메모리(Static Memory) : 전역 변수나 정적 변수 등이 저장됩니다. 프로그램이 종료될 때 해제됩니다. 

자동 메모리(Automatic Memory) : 스택 구조로 이루어져 있어 코드블록( {와 }의 괄호) 범위 내에서 저장되었다가 제거됩니다.
블록이 끝나는 곳에서 자동으로 메모리를 해제합니다. 

자유 저장소(Free Store) : 프로그래머가  malloc()과 free()함수를 이용하여 직접 메모리를 할당하고 해제 합니다. 


자유 저장소에 메모리를 할당하려면 malloc 함수를 이용합니다. 

Node* NewNode = (Node*)malloc(sizeof(Node));

void * malloc(size_t size);

malloc() 함수의 반환형인 void*는 어느 자료형의 주소도 가리킬 수 있습니다. 

따라서 Node*형의 주소를 가리키라고 명시를 해줍니다.

(Node*)malloc(데이터의 크기)


노드 생성 

다음은 노드를 생성하는 함수 CreateNode 입니다. 


malloc으로 메모리를 할당하고, 

데이터를 저장하고, 

다음 노드에 대한 포인터를 NULL로 초기화 합니다. 

할당 받은 메모리의 주소를 리턴합니다. 

/* 노드 생성 */
Node* CreateNode(int data) {

	Node* newNode = (Node*)malloc(sizeof(Node));
	newNode->data = data;
	newNode->nextNode = NULL;

	return newNode;
}


노드를 메모리에서 해제하기 

메모리 해제 함수인 free(노드의포인터)는 DeleteNode() 함수내에서 처리합니다. 


노드 추가 

노드 추가 연산은 테일 노드 뒤에 새 노드를 만들어 연결하는 것입니다. 

(맨 뒤의 노드를 테일tail 노드, 리스트 맨 앞의 노드가 헤드head 노드 입니다.)


일단, 테일이 어디인지 계속 포인터를 따라가 봐야 합니다. 

헤드노드가 없으면(== 리스트가 비었다면), 추가한 노드가 헤드가 됩니다. 

다음은 노드를 추가하는 AppendNode 함수 입니다. 


주의 할 점! 
list 포인터의 주소를 넘겨야 하므로, (주소의 주소가 필요하므로)
노드를 추가하는 함수를 정의할 때, 헤드 노드의 매개변수는 **Node가 되어야 합니다.
/* 노드 추가. 테일 노드 찾아서 그 뒤에 새 노드를 붙인다 */
void AppendNode(Node** head, Node* newNode) {

	/* 리스트가 비었다면 헤드에 뉴 노드 */
	if (NULL == (*head)) {
		(*head) = newNode;
	}
	else { // 헤드부터 시작해서 테일을 찾아냄
		Node* tail = (*head);

		while (NULL != tail->nextNode) { // 다음노드가 NULL인 것이 테일
			tail = tail->nextNode;
		}

		tail->nextNode = newNode;
	}
}


노드를 생성하고 추가하는 코드 예시입니다. 

int main() {
	Node* list = NULL;
	Node* newNode = NULL;

	newNode = CreateNode(10);   /* 자유 저장소에 노드 생성 */
	AppendNode(&list, newNode);

	return 0;
}


왜 Node** head 일까? Node* head 가 아니라. 

List라는 포인터변수가 위치하는 메모리 주소를 넘겨야 그 List 변수 안에 newNode라는 주소를 할당할 수 있습니다. 

포인터변수의 주소는 '포인터의 포인터' 입니다. 그래서 Node** head를 넘겨야 합니다.  

포인터변수 안의 '값'을 알고 싶다면,  포인터 변수 Node* head를 넘기면 됩니다.

그러나, 포인터변수 그 자체의 '값'을 할당 하려면, 변수의 위치(==주소)를 알아야 합니다. 

( 포인터 변수의 위치 == 포인터 변수의 주소 == 포인터의 포인터 )


노드 탐색 

링크드 리스트는 인덱스를 이용하는 배열과는 다르게, 헤드 노드부터 차근차근 탐색해야만 임의의 위치의 노드를 찾을 수 있습니다. 

(이것은 리스트의 약점 중 하나)

다음은 특정 위치를 입력하여 그 위치의 노드의 주소를 반환하는 GetLocation함수 입니다. 


Node* GetLocation(Node* head, int location) {

	printf("%d번째 노드를 찾아보자. \n", location);

	Node* current = head;

	while ((NULL != current) && (--location) >= 0) {
		printf("location : %d 번째 탐색 \n", location);
		current = current->nextNode;

	}

	return current;
}

탐색 할때는 헤드만 알면 됩니다. 헤드는 첫 노드의 주소를 알고 있기 때문입니다.  


사용 예시입니다. 

노드 3개가 들어있는 리스트를 만들고, 

1번째 노드 위치를 찾습니다. 이때, 인덱스 0을 찾도록 합니다. 

int main() {
	Node* list = NULL;
	Node* targetNode = NULL;

	/* 자유 저장소에 노드를 생성하여 List에 추가  */
	AppendNode(&list, CreateNode(100));
	AppendNode(&list, CreateNode(200));
	AppendNode(&list, CreateNode(300));

	// 2번째 노드를 찾으려면, 1을 입력. 
	// 1번째 노드를 찾으려면, 0을 입력.
	targetNode = GetLocation(list, 0);
	printf("[탐색 결과] TargetNode의 Data : %d\n", targetNode->data);

	return 0;
}


탐색에서 유의할 점은 노드의 인덱스 입니다.

2번째 노드를 찾더라도, 실제로 GetLocation()함수에 넘겨줘야할 숫자는 1입니다. 


GetLocation 함수의 location는 while문 조건 내부에서 (--location) 으로 쓰입니다. 

location이 0인 0번째 노드는 head인 current 이기 때문입니다. 

이미 head가 0번째 노드 입니다. 

while문에서 조건을 비교할 순간에는, location이 1이 되어야 합니다. (그리고 location은 0 또는 0보다 커야 합니다.)


리스트 순회 

노드가 제대로 삽입됬는지 확인하기 위해, '리스트 내의 모든 노드를 순회하는 함수'를 만들었습니다. 

void PrintList(Node* head) {

	Node* tempNode = head;
	int count = 0;

	while (NULL != tempNode) {
		printf("%5d", tempNode->data);
		tempNode = tempNode->nextNode;
		count++;
	}
	printf("\n");
	printf("%5d개의 노드가 있습니다.\n", count);
}

printf() 내의 %5d는 5칸의 공백을 두고 integer를 출력하는 코드입니다. 

마지막에는 '총 노드 개수'를 출력했습니다. 


노드 삭제 


노드 삭제 연산은 특정 위치의 노드를 삭제합니다. 

특정 위치는 current 노드의 다음 노드라고 가정하고 target을 찾습니다. 

삭제할 target 노드를 찾고, 그

노드의 앞 노드(current)가 삭제할 노드의 다음 노드(target->nextNode)를 가리키도록 이어주면 됩니다. 

마지막으로 free() 함수로 타겟노드를 메모리에서 해제합니다. 


RemoveNode()는 다음과 같습니다. 

void RemoveNode(Node** head, Node* target) { 

	printf("%d를 삭제합니다.\n", target->data);

	// 헤드가 타겟이면
	if ((*head) == target) {
		(*head) = (*head)->nextNode;
	}
	else {
		// 현재의 다음노드가 타겟인지 검사하며 탐색  
		Node* current = (*head);

		while ((current->nextNode != target) && (NULL != current)) {
			current = current->nextNode;
		}

		// 현재의 다음이 타겟이므로. 현재와 '타겟의 다음'을 이어준다.
		current->nextNode = target->nextNode;
	}

	free(target);
}


아래는 노드 추가, 탐색, 삭제 예시입니다. 

int main() {
	Node* list = NULL;
	Node* targetNode = NULL;

	/* 자유 저장소에 노드를 생성하여 List에 추가  */
	AppendNode(&list, CreateNode(100));
	AppendNode(&list, CreateNode(200));
	AppendNode(&list, CreateNode(300));

	// 리스트 전체 출력 
	PrintList(list);

	// 2번째 노드를 찾으려면, 1을 입력. 
	// 1번째 노드를 찾으려면, 0을 입력.
	targetNode = GetLocation(list, 0);
	printf("[탐색 결과] TargetNode의 Data : %d\n", targetNode->data);

	// 1번째 노드(인덱스 0) 을 삭제 
	RemoveNode(&list, targetNode);

	// 리스트 전체 출력 
	PrintList(list);
	
	return 0;
}

콘솔 결과


모든 노드 삭제 

리스트 헤드 노드 주소를 파라미터로 넘기면, 모든 노드를 삭제하는 RemoveAll()함수입니다. 

void RemoveAll(Node** head) {
	printf("리스트 전체를 삭제 \n");

	Node* tempNode = (*head);

	while (NULL != tempNode) {
		// 헤드 갱신해두고 
		(*head) = tempNode->nextNode;
		// tempNode를 메모리 해제 
		free(tempNode);
		// 헤드 주소를 다시 tempNode에 저장 
		tempNode = (*head);
	}
}


특정 노드 뒤에 삽입

일단 새 노드를 만듭니다. 

특정 노드를 기준으로, 새 노드가 특정 노드의 다음 노드를 가리키도록 하고, 특정 노드는 새 노드를 가리키게 합니다. 

다음은 InsertAfter() 함수 입니다. 

/* 노드 삽입. 특정 위치 뒤에 삽입 */
void InsertAfter(Node* current, Node* newNode) {
	
	newNode->nextNode = current->nextNode;
	current->nextNode = newNode;
}


특정 노드 앞에 삽입

다음은 InserBefore() 함수 입니다. 

/* 노드 삽입. 특정 위치 앞에 삽입 */
void InsertBefore(Node** head, Node* current, Node* newNode) {
	printf("[InsertBefore] %d를 삽입합니다. \n", newNode->data);

	Node* tempNode = (*head);

	if (tempNode == current) {
		// 헤드 노드앞에 뉴 노드 
		newNode->nextNode = tempNode;
		(*head) = newNode;		
	}
	else {

		while (tempNode->nextNode != current) {
			tempNode = tempNode->nextNode;
		}
		//tempNode 다음이 current인 상태.
		newNode->nextNode = current;
		tempNode->nextNode = newNode;
	}
}


전체 코드입니다.

#include <stdio.h>
#include <stdlib.h>


/* 노드 선언 */
typedef struct Node {
	int data;
	struct Node* nextNode;
}Node;

/* 노드 생성 */
Node* CreateNode(int data) {

	Node* newNode = (Node*)malloc(sizeof(Node));
	newNode->data = data;
	newNode->nextNode = NULL;

	return newNode;
}

/* 노드 추가. 테일 노드 뒤에 새 노드를 추가. */
void AppendNode(Node** head, Node* newNode) {

	printf("[AppendNode] 데이터 %2d 추가합니다. \n", newNode->data);

	/* 리스트가 비었다면 헤드에 뉴 노드 */
	if (NULL == (*head)) {
		(*head) = newNode;
	}
	else {
		Node* tail = (*head);

		while (NULL != tail->nextNode) {
			tail = tail->nextNode;
		}

		tail->nextNode = newNode;
	}
}

/* 노드 탐색 */
Node* GetLocation(Node* head, int location) {
	printf("[GetLocation]%d번째 노드를 찾아보자. \n", location);

	Node* current = head;

	while ((NULL != current) && (--location) >= 0) {
		printf("location : %d 번째 탐색 \n", location);
		current = current->nextNode;

	}

	return current;
}

/* 노드 삭제 */
void RemoveNode(Node** head, Node* target) { 

	printf("[RemoveNode] %2d를 삭제합니다.\n", target->data);

	// 헤드가 타겟이면
	if ((*head) == target) {
		(*head) = (*head)->nextNode;
	}
	else {
		// 현재의 다음노드가 타겟인지 검사하며 탐색  
		Node* current = (*head);

		while ((current->nextNode != target) && (NULL != current)) {
			current = current->nextNode;
		}

		// 현재의 다음이 타겟이므로. 현재와 '타겟의 다음'을 이어준다.
		current->nextNode = target->nextNode;
	}

	free(target);
}

/* 리스트 출력 */
void PrintList(Node* head) {
	printf("[PrintList] 리스트 전체를 출력합니다. \n");

	Node* tempNode = head;
	int count = 0;

	while (NULL != tempNode) {
		printf("%5d", tempNode->data);
		tempNode = tempNode->nextNode;
		count++;
	}
	printf("\n");
	printf("%5d개의 노드가 있습니다.\n", count);
}


/* 모든 노드 삭제  */
void RemoveAll(Node** head) {
	printf("[RemoveAll] 리스트 전체를 삭제합니다. \n");

	Node* tempNode = (*head);

	while (NULL != tempNode) {
		// 헤드 갱신해두고 
		(*head) = tempNode->nextNode;
		// tempNode를 메모리 해제 
		free(tempNode);
		// 헤드 주소를 다시 tempNode에 저장 
		tempNode = (*head);
	}
}


/* 노드 삽입. 특정 위치 뒤에 삽입 */
void InsertAfter(Node* current, Node* newNode) {
	printf("[InsertAfter] %d를 삽입합니다. \n", newNode->data);

	newNode->nextNode = current->nextNode;
	current->nextNode = newNode;
}


/* 노드 삽입. 특정 위치 앞에 삽입 */
void InsertBefore(Node** head, Node* current, Node* newNode) {
	printf("[InsertBefore] %d를 삽입합니다. \n", newNode->data);

	Node* tempNode = (*head);

	if (tempNode == current) {
		// 헤드 노드앞에 뉴 노드 
		newNode->nextNode = tempNode;
		(*head) = newNode;		
	}
	else {

		while (tempNode->nextNode != current) {
			tempNode = tempNode->nextNode;
		}
		//tempNode 다음이 current인 상태.
		newNode->nextNode = current;
		tempNode->nextNode = newNode;
	}
}


int main() {
	Node* list = NULL;
	Node* targetNode = NULL;

	/* 자유 저장소에 노드를 생성하여 List에 추가  */
	AppendNode(&list, CreateNode(100));
	AppendNode(&list, CreateNode(200));
	AppendNode(&list, CreateNode(300));

	// 리스트 전체 출력 
	PrintList(list);

	// 2번째 노드를 찾으려면, 1을 입력. 
	// 1번째 노드를 찾으려면, 0을 입력.
	targetNode = GetLocation(list, 0);
	printf("[탐색 결과] TargetNode의 Data : %d\n", targetNode->data);

	// 1번째 노드(인덱스 0) 을 삭제 
	RemoveNode(&list, targetNode);

	// 리스트 전체 출력 
	PrintList(list);
	
	targetNode = GetLocation(list, 0);
	// 헤드 앞에 2개 삽입 
	InsertBefore(&list, targetNode, CreateNode(50));

	targetNode = GetLocation(list, 0);
	InsertBefore(&list, targetNode, CreateNode(60));

	// 리스트 전체 출력 
	PrintList(list);

	targetNode = GetLocation(list, 0);
	// 헤드 뒤에 삽입 
	InsertAfter(targetNode, CreateNode(70));

	// 리스트 전체 출력 
	PrintList(list);

	// 모든 노드 삭제 
	RemoveAll(&list);
	// 리스트 전체 출력 
	PrintList(list);

	return 0;
}


다음 포스팅은 '더블 링크드 리스트'입니다. 

728x90

'알고리즘 > 알고리즘 C' 카테고리의 다른 글

순환 큐  (0) 2020.03.09
링크드 리스트로 구현하는 스택  (0) 2020.02.19
배열로 구현하는 스택  (0) 2020.02.18
환형 링크드 리스트  (0) 2020.02.17
더블 링크드 리스트  (0) 2020.02.14

백준 괄호 문제 풀이  https://www.acmicpc.net/problem/9012


9012번: 괄호

문제 괄호 문자열(Parenthesis String, PS)은 두 개의 괄호 기호인 ‘(’ 와 ‘)’ 만으로 구성되어 있는 문자열이다. 그 중에서 괄호의 모양이 바르게 구성된 문자열을 올바른 괄호 문자열(Valid PS, VPS)이라고 부른다. 한 쌍의 괄호 기호로 된 “( )” 문자열은 기본 VPS 이라고 부른다. 만일 x 가 VPS 라면 이것을 하나의 괄호에 넣은 새로운 문자열 “(x)”도 VPS 가 된다. 그리고 두 VPS x 와 y를 접합(conc

www.acmicpc.net

닫는 괄호로 시작하는 경우에 어떻게 할지 예외처리를 안넣어줘서 시간이 좀 걸렸다.


#define _CRT_SECURE_NO_WARNINGS
#include <stdio.h>
#include <stdlib.h>
#include <iostream>
#include <string.h>

using namespace std;

void check() {
	char stack[50] = {0, };
	int stack_idx = 0;

	char* inputStr = (char*)malloc(sizeof(char) * 50);
	scanf("%s", inputStr);

	int lenSize = strlen(inputStr);

	for (int i = 0; i < lenSize; i++) {
		if (0==i && ')' == inputStr[i]) { //닫는괄호로 시작함.
			printf("NO\n");
			free(inputStr);
			return;
		}
		else {
			if ('(' == inputStr[i]) { //스택에 여는괄호를 넣는다 
				stack[stack_idx] = '(';
				stack_idx++;
			}
			else if (')' == inputStr[i]) { // 닫는괄호 발견.
				if (0 < stack_idx) { // 스택에 여는괄호가 있다면, 하나 삭제.
					stack[stack_idx] = 0;
					stack_idx--;
				}
				else {
					// 여는 괄호 보다, 닫힌 괄호가 더 많음. 불완전.
					printf("NO\n");
					free(inputStr);

					return;
				}
			}
		}

	}

	//printf("stack_idx : %d", &stack_idx);

	if (0 == stack_idx) {
		printf("YES\n");

	}
	else {
		printf("NO\n");
	}

	free(inputStr);
	return;

}

int main() {

	// 반복 횟수 입력 받기
	int repeat = 0;

	scanf("%d", &repeat);

	while (repeat) {
		check();
		repeat--;
	}

	return 0;
}


728x90

'알고리즘 > 백준' 카테고리의 다른 글

카드 구매하기 백준 11052  (0) 2020.08.13
2xn 타일링2 백준 11727번  (0) 2020.08.12
2xn 타일링 백준 11726번  (0) 2020.08.12
분산처리 백준 1009번 c++  (0) 2020.08.12
스택 백준 10828번  (0) 2020.08.12

((유의)) 직접 검색해서 이해한 내용만 정리한 것이므로 틀린 부분이 있을 수 있습니다! (지적해주시면 감사하겠습니다.)


모델의 하이퍼파라미터를 최적화 하려면, 보통 데이터 엔지니어의 직관 또는 최적화 라이브러리를 사용한다고 한다. 

(직관이라니.)


케라스를 이용하여 데이터를 학습 및 예측 하다가 학습률, 감쇄율, 배치사이즈 등의 파라미터를 로또 번호맞추는 느낌으로 맞추고 있는 나자신을 발견하고, 하이퍼파라미터 최적화 라이브러리를 찾아봤다. 


Keras + Hyperopt: A very simple wrapper for convenient hyperparameter optimization 라고 소개되어 있다. 

(readme.md 부터 예시가 아주 친절하다.)

https://github.com/maxpumperla/hyperas


maxpumperla/hyperas

Keras + Hyperopt: A very simple wrapper for convenient hyperparameter optimization - maxpumperla/hyperas

github.com


여기서도 다운로드 가능하다.

http://maxpumperla.com/hyperas/


Hyperas by maxpumperla

Hyperas A very simple convenience wrapper around hyperopt for fast prototyping with keras models. Hyperas lets you use the power of hyperopt without having to learn the syntax of it. Instead, just define your keras model as you are used to, but use a simpl

maxpumperla.com


hyperas의 구조

data() : 데이터를 읽어오고 전처리하여 입력과 출력을 리턴한다. (학습용 입출력, 검증용 입출력 총 4개를 리턴)

model() : 모델 구조와 하이퍼파라미터를 지정하고 학습한다. 

optim.minimize() : data()와 model()을 반복 수행하여 최적의 파라미터를 알려준다. max_evals로 시도 횟수를 지정할 수 있다. 


hyperas의 동작 흐름

main함수에서 optim.minimize() 의 Trials()가 실행되어 data()와 model()이 반복적으로 수행된다. 


사용법 

기존 프로젝트에 hyperas의 함수들을 끼워넣어 시험하려고 했었지만 실패했다. (ㅠㅠ...)

main함수, data(), model()만 있는 테스트 모듈을 따로 만들어서 시험하니까 동작했다. 

hyperas에서 파라미터 시험을 위해 uniform() 과 choice()를 제공한다. 


시험하려는 값들의 리스트를 choice 함수 안에 입력할 수 있다. 

{{ 를 이용하는 것이 특이하다. 

배치사이즈의 경우, 결과값은 batch_size = 0 이런식인데, 리스트의 인덱스가 리턴된다고 보면 된다.

위 코드의 경우, best batch_size는 1440이다. 


또는 시험하려는 수치 범위를 uniform 내에 입력할 수 있다. 

0에서 1 사이의 값에서 시도해보자는 뜻이다. 


실행해보면,  {{ 로 감싸진 부분들이 def get_space() 의 변수로 들어가는 것을 콘솔에서 확인할 수 있다. 


위의 변수를 통해 최종 결과로 무엇이 나올 지 미리 알수 있다. 


새롭게 알게된 내용이 있으면 추가해 놓을 예정이다. 


혹시 도움이 되었다면 하트를 눌러주세요!


글 내용에 관한 의견은 댓글로 주시면 감사하겠습니다 :)

728x90

도전 프로그래밍2 - 5번문제


배열에 저장되어 있는 요소들을 내림차순으로 정렬하는 함수 DesSort를 정의하자. 

그리고 이 함수를 호출하는 예제를 작성해보자.


일단 길이가 7인 int형 배열을 선언해서 프로그램 사용자로부터 7개의 정수를 입력 받도록 하자. 


그리고 입력 받은 정수를 내림차순으로 정렬하기 위해서, 배열을 인자로 전달하면서 DesSort 함수를 호출하고,

제대로 정렬이 되었는지 확인하기 위해 배열의 요소들을 순서대로 출력해보자. 

#include <stdio.h>
/*
도전 프로그래밍2 - 열혈C 333pg
*/

void DesSort(int *arr);
void Print(int *arr);

int target[7];
int len = sizeof(target) / sizeof(int);		//len==7

void DesSort(int *arr)
{
	int temp, i, j;
	for (j = 0; j < len - 1; j++)
	{
		for (i = 0; i < len - 1; i++)
		{
			if (arr[i] < arr[i + 1])
			{	//자리교환 
				temp = arr[i];
				arr[i] = arr[i + 1];
				arr[i + 1] = temp;
			}
		}
	}
}
void Print(int *arr)
{
	int i = 0;
	for (i; i < len; i++)
	{
		printf("%d ", arr[i]);
	}
	printf("\n");
}
int main()
{

	int i;
	//정수 7개 입력받기 
	for (i = 0; i < 7; i++)
	{
		scanf("%d", &target[i]);
	}

	DesSort(target);
	Print(target);
	return 0;
}


728x90

+ Recent posts